talla murali

  • Health Tips
  • Tech Tips
  • iphone
  • #91 (no title)

9 hidden gems worth digging up in Android 11

Android 11’s most important additions may be more about privacy than any front-facing flashiness, but the software sure does have its share of significant surface-level improvements.

I’ve been using the new Android 11 Beta release since it arrived last Wednesday. It’s our first real look at Google’s complete (or at least near-complete) vision for the next Android version, and it has quite a few new small but impactful experience-enhancing elements. Some of ’em fit into the three broad themes I covered in my most recent newsletter, while others are just scattered little treasures strewn throughout the software.

But all of ’em are things you wouldn’t necessarily notice on your own — and, in some cases, wouldn’t even see unless you knew which out-of-the-way switch to flip.

Whether you’re among the adventurous explorers already trying out Android 11 or you’re keeping an analytical eye on it from a distance, these noteworthy new touches are worth considering and/or keeping in mind for the future.

(Of note: I wouldn’t suggest most people install the Android 11 Beta at this point — especially not on a primary phone that’s needed for day-to-day productivity. The software is relatively stable, but it’s still a beta-level release that’s unfinished and not intended for broad, public use, and you will run into occasional glitches and app compatibility issues when using it.)

Android 11 gem #1: Notification History

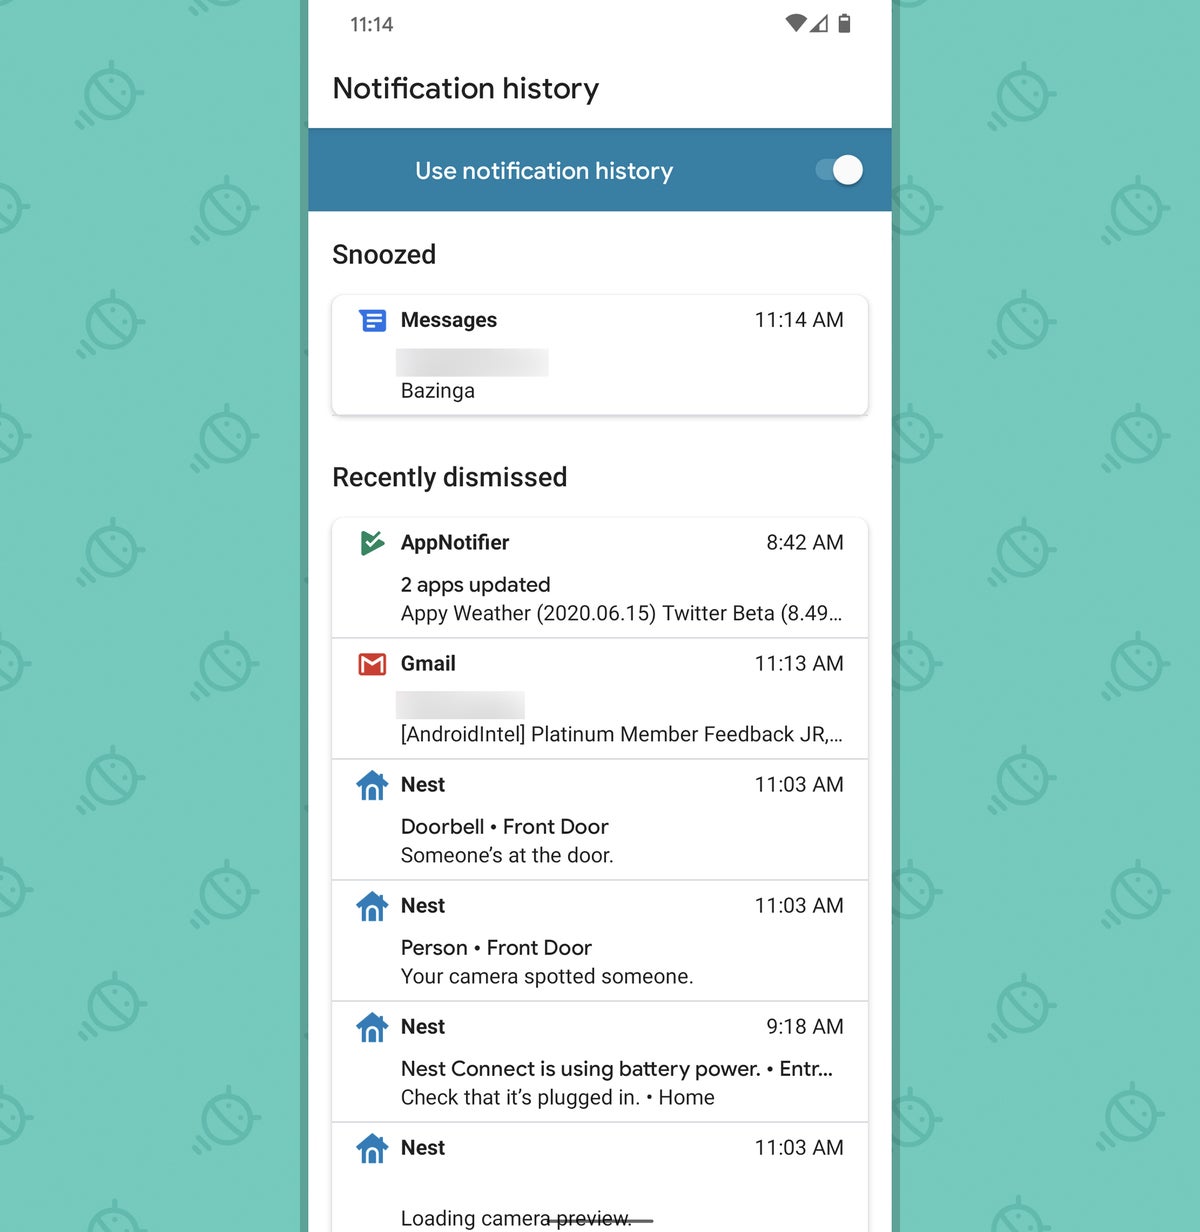
First up is a feature I’ve been longing to see in Android for ages: a built-in and user friendly Notification History section. What’s present in Android 11 isn’t the full notification inbox concept I’d been envisioning, but hey, baby steps, right?

All quibbling aside, Android 11’s Notification History feature does exactly what you’d expect: It gives you an easy way to look back at notifications you’ve dismissed and even interact with their contents as if they were still present. You can go back as far as 24 hours — but there’s a catch: The feature won’t be present unless you first find and enable it.

To do that, open up the Apps & Notifications section of your system settings, tap the line that says “Notifications,” and then look for the new “Notification history” line at the top of the screen that comes up. Tap that, and you’ll be able to activate a toggle to turn the feature on.

And once you do, well, good golly, how ’bout that?

Android 11: Notification HistoryJR

There she is! You can pull up your fancy new Notification History section anytime by looking for the “History” option beneath your notifications.

Android 11: Notification History commandJR

So long, accidental-swipe-away regret!

Android 11 gem #2: Priority conversation alerts

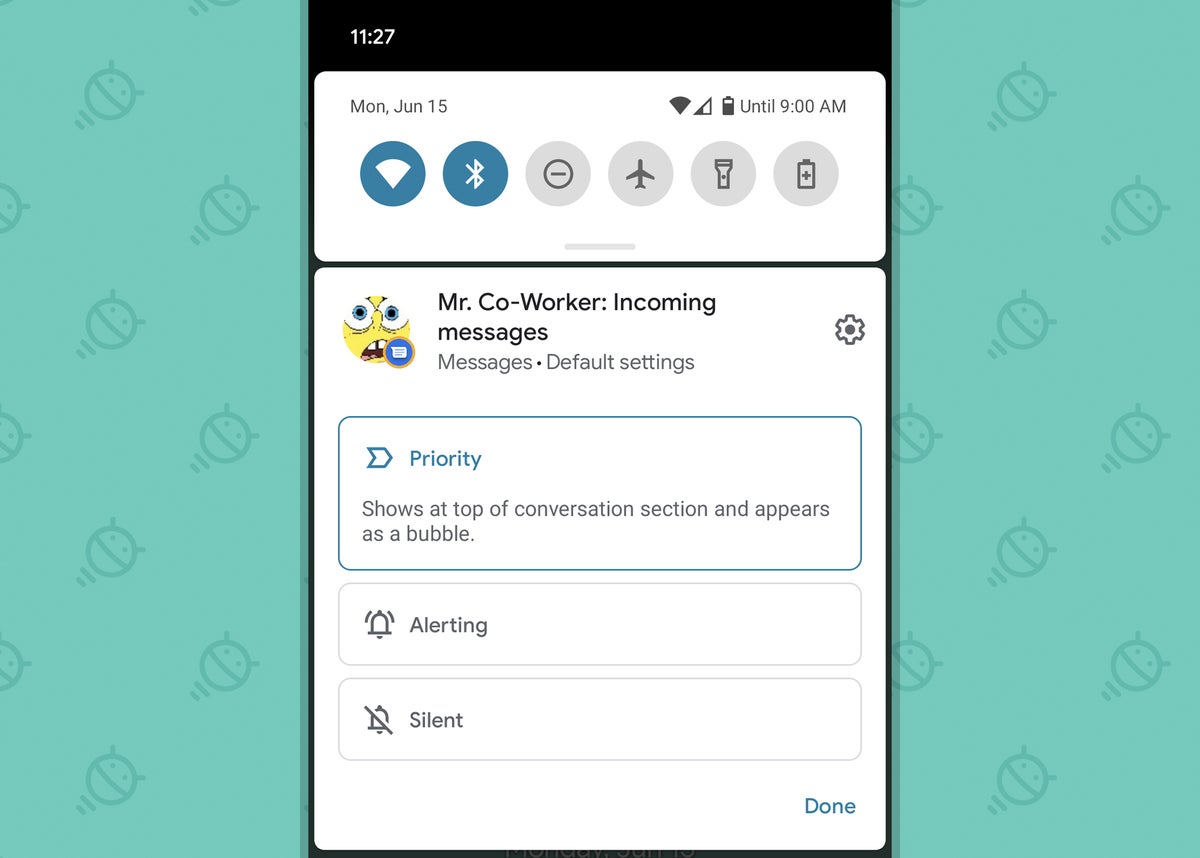
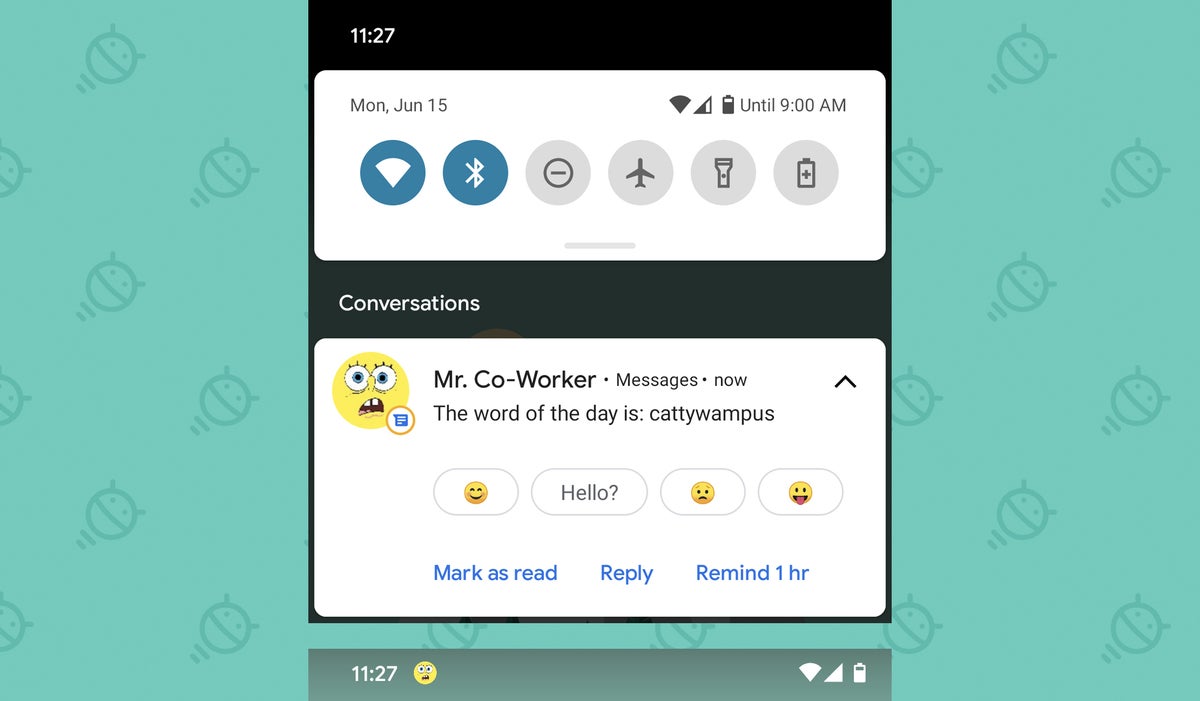
One of Android 11’s most interesting adjustments is the way it emphasizes conversation-related notifications — putting all such alerts, regardless of what messaging app they came from, into their own separate section at the top of your notification panel. But there’s another part of that system that’s pretty powerful and handy to have.

When you press and hold any notification within the new Conversations section, you’ll see a one-touch option for setting it as a “Priority” conversation:

Android 11: Priority conversationJR

Activating that option will cause any future alerts from that specific contact to appear at the top of your Conversations section — and, in a neat little touch, will also cause that person’s profile photo to appear as its own separate icon within the status bar at the top of your screen whenever a notification from them is present.

Android 11: Priority conversation notificationJR

Visual novelty aside, that really does make it easier to see when something particularly pressing — an incoming message from your boss, an alert about your extra-large meatball sandwich being ready for pickup, or whatever the case may be — is demanding your attention.

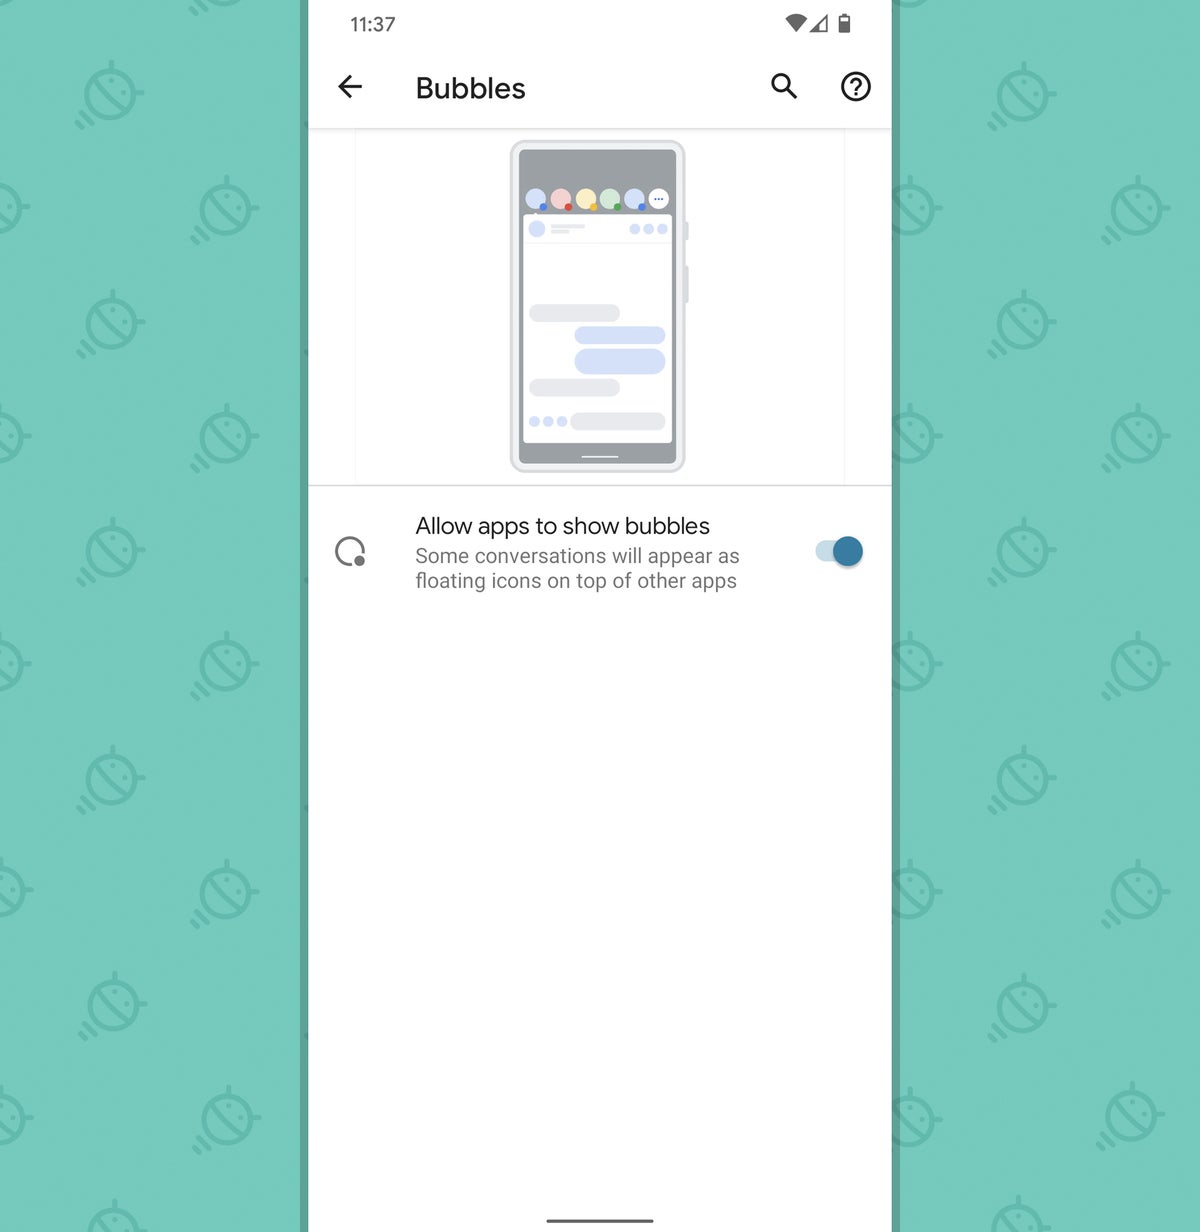
Android 11 gem #3: Bubbles

As you may or may not know by now, I’m very intrigued by Bubbles — a new multitasking system we first heard about in Android 10 and are just now getting to experience for the first time. Well, almost.

The idea behind Bubbles is to have a system-level interface for keeping important conversations (and perhaps also eventually other sorts of content) on demand and readily available anytime via a small circular icon that sits atop whatever else you’re doing. Tap the icon, and the associated conversation will appear in a floating window. Tap it again, and it gets condensed back down into the bubble.

The problem, as of right now, is that Bubbles requires apps to support it in order to mean anything — and so far, best I can tell, somewhere between “hardly any” and “absolutely zero” apps actually do. But that’s bound to change before long, via Google’s own Messages app, if nothing else. (The official word from Google is that Messages should get Bubbles support in its beta channel within the next couple weeks and then more broadly sometime in the next month or so.)

In the meantime, you can get your phone ready for Bubbles by enabling the feature: Just head back into the Apps & Notifications section of your system settings, again tap “Notifications,” and this time, look for the line labeled “Bubbles.”

Tap that, then flip on the toggle to activate it.

Android 11: Bubbles
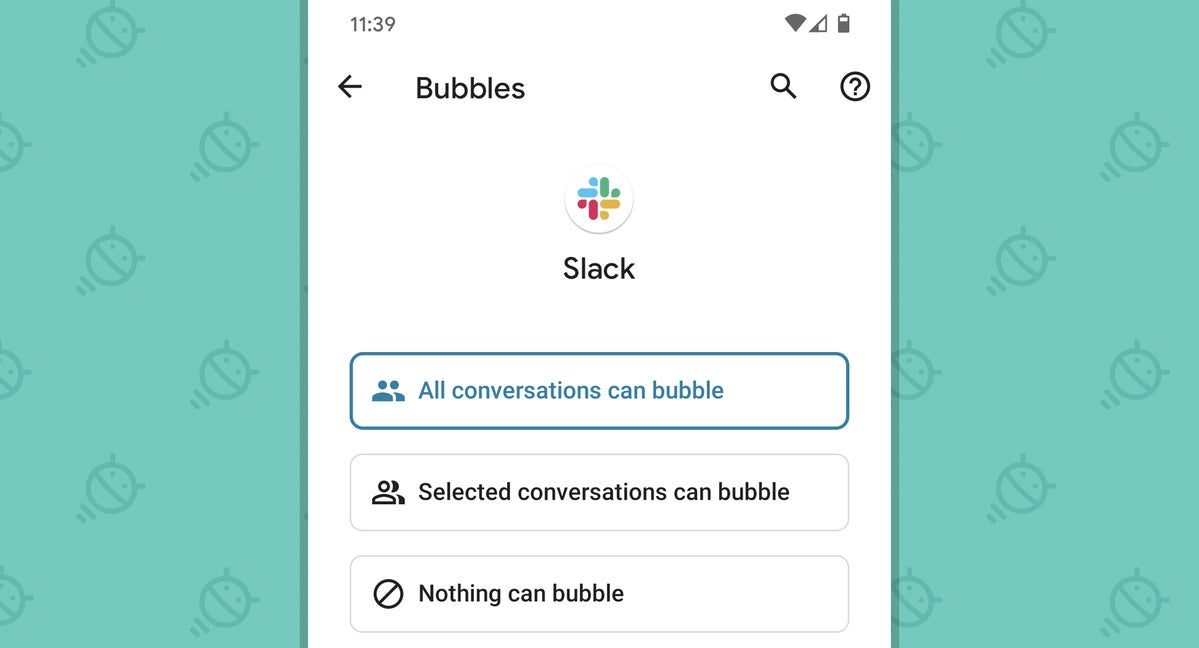
JR

You can also manually enable or disable any specific app’s ability to turn a conversation into a bubble by going back to the main Apps & Notification screen within your system settings, tapping the “See all apps” line, then finding and selecting the app you want in the list. Once you’re in the app’s settings screen, tap “Notifications” and then look for the “Bubbles” option there.

Android 11: Bubbles appJR

Mmm…bubbly.

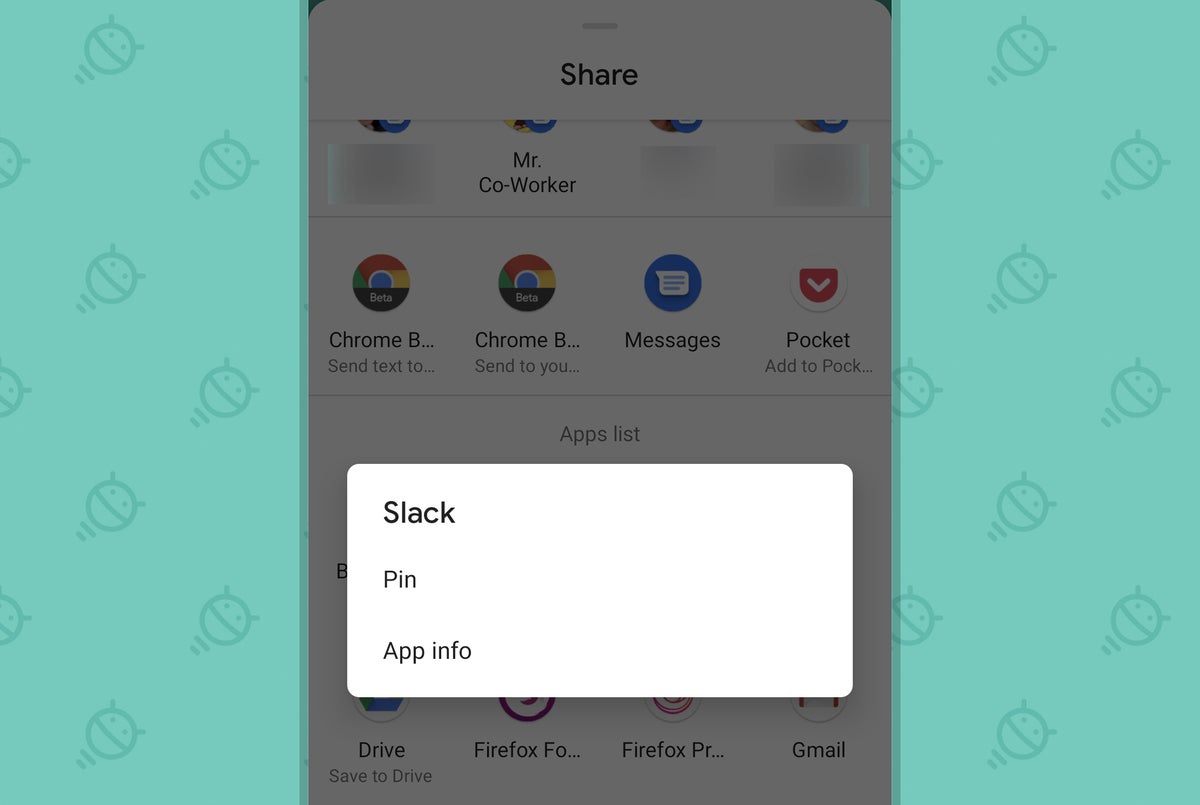
Android 11 gem #4: Custom share pinning

This next thing is an especially tiny and trivial-seeming touch, but my goodness, am I ever excited to see it. It’s the return of a little-known, underappreciated option from Android’s Nougat era that lets you customize the system share menu — the list of options that pops up when you hit the Share command from within an app.

Android’s share menu is a useful way to move info from one app to another, but the options you use the most often aren’t at the top of the list. Well, after eliminating the ability to customize the order at some point along the way, Google is giving us back that power. And I, for one, will gladly accept it.

To take control of your system share menu in Android 11, just share something from an app — for instance, in Chrome, you could tap the three-dot menu icon while viewing a web page and then select Share — and then just press and hold your finger to any icon in the list that pops up and tap the option to pin it.

Android 11: Share pinJR

That’ll place the icon into a special section at the top of your share menu, where it’ll appear consistently no matter what app you’re sharing from (so long as the app isn’t annoyingly using its own custom share interface instead of the system standard, that is — grumble, grumble, grumble).

It was an awesome hidden gem when it first showed up back in 2016, and it’s just as awesome upon its revival today.

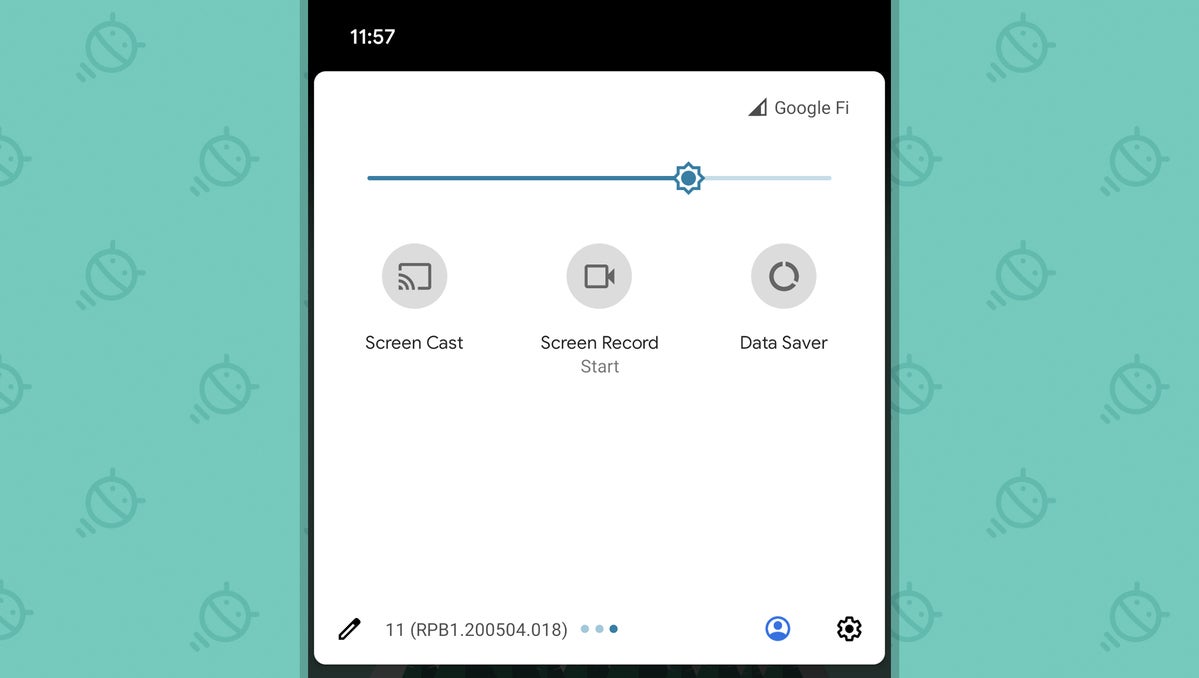
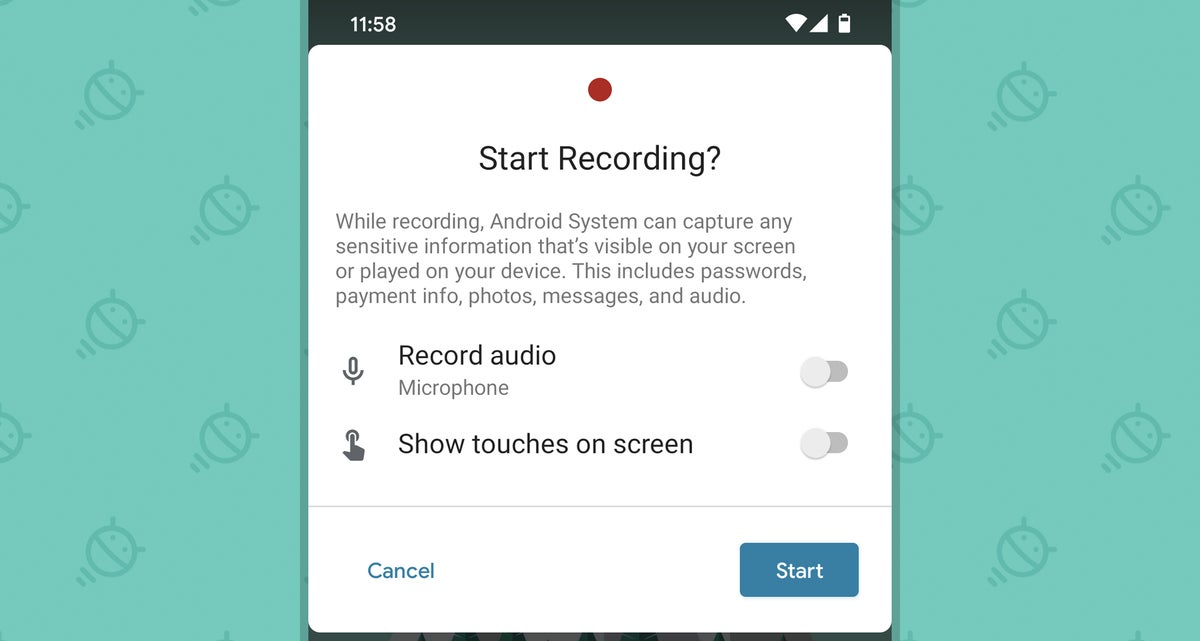
Android 11 gem #5: A native screen recorder

Ever find yourself needing to record something on your screen — maybe to show someone else a feature or to provide a distanced demo of some sort? Traditionally, you’ve needed a third-party app on Android to accomplish that. As of Android 11, that’s no longer the case.

This first beta includes a new native screen recording system, although — once again — it’s up to you to find it.

The option is tucked away in your Quick Settings section, so start by swiping down from the top of your screen twice to open that area up — then tap the tiny little pencil icon in the lower-left corner to edit it.

Once you’ve done that, you should be able to scroll down and find an icon for “Screen Record” in the section of the screen devoted to inactive Quick Settings options. Hold your finger onto its icon and drag it up into any spot you like within the active Quick Settings area, then back out of that editing menu, and you should be able to find the icon exactly where you plopped it:

Android 11: Screen recordJR

All that’s left is to tap that sucker, and ta-da:

Android 11: Screen record promptJR

You can even opt to have the recorder capture audio via the phone’s mic, in case you want to narrate along with whatever you’re showing, and you can have it make a visual mark on the screen every time you touch anywhere in order to illustrate exactly what you’re doing. (With the third-party recorder apps of yore, you’d have to wade deep into Android’s developer options in order to accomplish such a feat.)

Unfortunately, the system is still lacking some screen recorder basics — like the ability to edit what you recorded and to convert it into an animated GIF for easy sharing — but it’s a start!

Android 11 gem #6: Smarter voice control

We’ve talked before about how Android’s Voice Access system is incredibly useful, even if you don’t need it for accessibility purposes — and with Android 11, the feature gets even more practical and powerful.

With past Android versions, you could use Voice Access for basic app-opening and on-screen navigation. You could use it for getting around apps, too, but only by saying the number it’d place on the screen next to selectable items — effective, sure, but not the simplest or most intuitive system.

Google Apps Android - Voice AccessJR

Well, with Android 11 in place, you can simply say the name of any command on the screen to have Voice Access activate it — no number referencing or complex-command-remembering required.

That’s obviously invaluable from an accessibility perspective, but it’s also just a fast and convenient way for anyone to do practically anything on a phone in a hands-free manner. To experience it, you need to install the Voice Access app and then follow the steps it gives you to activate it.

Android 11 gem #7: Dark mode scheduling

This next one’s technically been available on Pixel phones for a little while now, thanks to an earlier Google “feature drop,” but it seems to be connected to Android 11 as well (and even if you have a Pixel phone, there’s a decent chance you had no idea it was there, anyway — three cheers for hidden Pixel features!).

It’s something super-simple but super-effective: the ability to schedule your system-wide dark mode so that it goes on and off automatically at certain times. That way, you could have your entire phone use a darker, easier-on-the-eyes motif from sundown to sunset — or from one specific time until another specific time (10 p.m. to 7 a.m., perhaps, if you lead as wild of a life as I do).

To find it, skip merrily into the Display section of your system settings, select the Dark Theme option, then tap the line labeled “Schedule” and pick whatever arrangement you like.

Android 11 gem #8: Resizable picture-in-picture video windows

Support for picture-in-picture video is yet another underappreciated Android feature, and with Android 11, it gets an extremely hard-to-find but handy new touch: When something is playing in a small floating box on your screen, Android 11 lets you resize the box to make it larger or smaller.

The feature is honestly kind of challenging to use in its current form, but it’s well worth figuring out. Just get something into a picture-in-picture box — by starting a YouTube video and then returning to your home screen or switching to another app, for instance, or by starting a Maps navigation and then doing the same thing — and then touch your finger to the box’s lower-left or lower-right corner and drag it up or down diagonally.

It might take you a few tries to find the precise right spot, but once you do, you’ll be able to make the box whatever size your precious little heart desires for even more effective mobile multitasking.

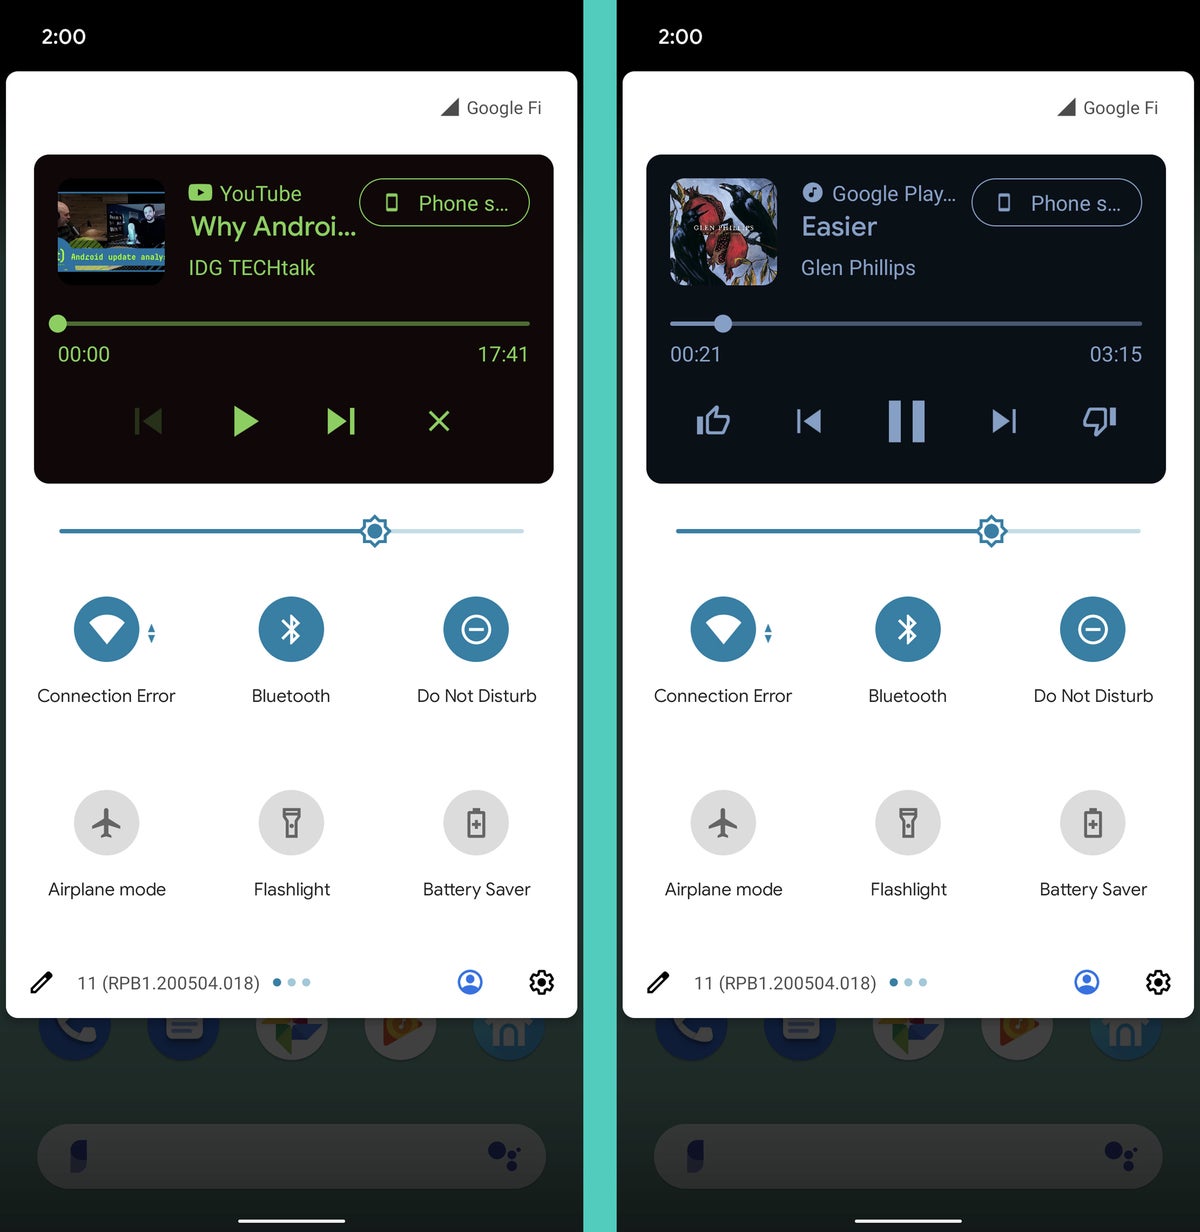
Android 11 gem #9: The streamlined media player

Last but not least, one of Android 11’s highest profile but hardest to find front-facing features: Android 11 replaces the notification-based media players of the past — where you’d get an individual control panel as a notification for every app in which you start playing audio or video — with a streamlined “carousel” that lives in your Quick Settings area and serves any and all media players in a single spot.

It’s actually quite clever: Instead of having all the different players in your notifications, you just have a single player in that one consistent place. And when you’ve had multiple apps playing audio or video, you can swipe left or right on the player to move from one set of controls to another.

Android 11: Media PlayerJR

There’s a catch, though: As of now, the feature is deactivated and completely invisible by default. And you really have to go out of your way to change that.

Here’s how:

  • Enable Android’s developer settings by opening the About Phone section of your system settings, scrolling down to the “Build number” line at the very bottom, and tapping that line seven times. The phone will confirm that you want to enable the settings and will probably make you put in your PIN or pattern, too.
  • Back out to the main settings menu, then go into the System section and tap “Advanced.”
  • Tap the line labeled “Developer options” toward the bottom of the screen.
  • Scroll down ’til you see the Media section and look for the line labeled “Media resumption.”
  • Activate the toggle next to that, then follow the prompts to restart your phone.

And that’s it: Anytime you play media from any app moving forward, you should see the nifty new carousel player in the Quick Settings area. (Just don’t mess around with any of the other developer settings unless you know what you’re doing!)

Some interesting stuff, eh? And we’re only just barely getting started.

Want even more Googley knowledge? Sign up for my weekly newsletter to get next-level tips and insight delivered directly to your inbox.

Concept images of navy blue iPhone 12 look impressive

Even though we’re now at the halfway point of the year which seems a little hard to believe, doesn’t it? Apple watchers still don’t have any sign of an exact iPhone 12 release date yet.

It’s safe to assume that Apple will unveil the iPhone 12 lineup at a special media event in September, though we’ve also seen reports indicating that the devices may not arrive until October. And even in a scenario where some iPhone 12 models go on sale by early October, there are rumblings that some iPhone 12 Pro models could be delayed until November or even December. The usual iPhone rumor mill has already been working overtime, nevertheless, with one recent report, for example, claiming that iPhone 12 production is set to begin in July (that comes from Digitimes, via SeekingAlpha).

In terms of what we do know at this point, we’re expecting 5G support to be included in these new phones, while Apple’s top of the line iPhone 12 Pro models will reportedly include a LiDAR sensor, improved optical zoom, as well as other camera enhancements. Multiple leaks have also suggested the iPhone 12 will boast more rectangular edges, with a design language that harkens back to the iPhone 4, released almost a decade ago.

Some new iPhone 12 renders have emerged, meanwhile, which offer some intriguing speculation about the design Apple might choose to go with here. Courtesy of SvetApple (per 9to5Mac), these images imagine the new iPhones with such design changes as a smaller notch on the front, as well as the possibility of a navy blue color option. That’s something that has really only been the subject of one rumor at this point, so while there aren’t more signs pointing to this as a possibility it still certainly looks an attractive option if Apple does decide to go this route (at least based on these images).


As we noted in a piece earlier today, it’s pretty certain at this point that there will be four new iPhone models (in addition to the iPhone SE that launched in April), and we expect all four models to have OLED displays and 5G support. Moreover, we believe that the iPhone 12 will start at $649. All in all, it will definitely be exciting to see what Apple has in store for iPhone fans on the design front once the iPhone 12 is finally revealed, whether or not it’s slightly delayed because of the coronavirus pandemic

Andy is a reporter in Memphis who also contributes to outlets like Fast Company and The Guardian. When he’s not writing about technology, he can be found hunched protectively over his burgeoning collection of vinyl, as well as nursing his Whovianism and bingeing on a variety of TV shows you probably don’t like.

How to Create a Local Windows 10 Account – ExtremeTech

In the five years since Microsoft released Windows 10, it’s made a number of positive changes to the operating system — and demonstrated a distinct willingness to use dark patterns to push users towards using online Windows 10 accounts.

There are certain benefits to using an online Microsoft account to sign in to Windows 10, including cross-device synchronization, automatic logins to MS services, and automatic sync with services like OneDrive. Most of the PCs I build are testbeds, so I don’t use a Windows account for these systems, and I’ve kept my own PC offline as well. Users who are using Microsoft Edge and the Windows Store will benefit more here than users who do not.

Note: While this article is about creating a local account, users with accessibility requirements and multiple PCs may explicitly want to use an MS account in order to automatically synchronize accessibility settings between devices. While this feature doesn’t affect many people, it’s quite valuable for those who need it.

While I prefer to keep my own PC tied to a local account, in the five years since Windows 10 launched we haven’t seen any privacy or security breaches that hit online account users but left local accounts safe. The benefits and drawbacks to using a Microsoft account for Windows 10 come down to how you feel about the idea and your concerns around privacy and security.

Apologies for some of the blur in these shots. You can’t screencap them for obvious reasons.

How to Create a Local Windows Account

You can create a local Windows account in Windows 10 2004 whether you are connected to the internet or not. The instructions for the disconnected option are shown below:

After you choose your keyboard layout and language preferences, the OS will ask you to connect to the internet. In Windows 1904 there was an option to click “I don’t have the internet” at the bottom of the left-hand side of the screen. This was the only way to initiate the local account creation process.

All images can be clicked on to enlarge.


After clicking “I don’t have internet,” the OS will attempt to convince you that creating a local account is a terrible idea. Click “Continue with limited setup.”

This will take you to the local account creation option.

Alternately, you can connect to the internet to complete installation. If you do, the next install page is rather different:

Choose the appropriate response and click “Next.” You’ll get the screen below, which looks like it forces you into an online-only account, but there’s actually an “Offline account” option.

I was genuinely surprised to see this option. Last I’d heard, Microsoft had changed the wording to “Domain join instead,” in a deliberate attempt to confuse users. We’re glad to see Microsoft revert to user-friendly wording.

Click on “Offline account” and the OS will beg you not to do it one last time:

You don’t get any games for using a Microsoft account (though you do get free OneDrive storage).

Click on “Limited Experience” and you’ll land on the create account page instead.

Wait. Guess I lied. Microsoft will, in fact, beg you yet again not to create a local account. Luckily, you can ignore it. Punch in your name and password on the following page and you’re golden.

Be aware that Microsoft likes to tweak the installation process and that it has often tweaked it in ways that made creating a local account harder. The 2004 update is more straightforward than Microsoft has shipped recently, and we’re glad to see it. At the same time, that last “Or better yet,” is tastelessly thirsty. Microsoft has never managed to communicate a cohesive set of features attached to a Microsoft account that would make it a must-use option, so it settles for relentlessly pushing you towards it at every opportunity.

I have two reasons for not wanting a Microsoft account tied to my local PC. First, I prefer to keep my desktop computing and my internet computing separated, and combining a web login with a desktop platform feels strange to me in a way I do not like and do not want. Second, Microsoft’s relentless and downright creepy insistence on the importance of an online account is an enormous turn-off. But both of those reasons are personal preferences/views, and I’m not aware of any security reasons to avoid a Microsoft account.

Windows 10’s Feature Experience Pack hints at a more modular future for the OS

Windows 10’s May 2020 update brings several new features and changes to the OS, not all of which will be immediately visible or seem useful to users.

One of these is the Windows Feature Experience Pack that automatically installs with this update as part of Microsoft’s Available Features on Demand.

The feature list includes several well-known Windows programs and components like Notepad, Wordpad, Paint, PowerShell ISE, DirectX Configuration Database, OpenSSH client, and Quick Assistant among others, which Microsoft bundles in the Windows 10 Image file (ISO).

Some of these items, including the new Feature Experience Pack, are now preinstalled in Windows 10 2004 ISO, and users on this version will notice its presence under their PC Settings. Although its purpose isn’t immediately clear, Microsoft is said to have been working on this pack for the past few months, which it says “includes features critical to Windows functionality” and therefore advises against its removal.

Unlike the Windows Experience Pack for previous OS versions (XP, Vista, and 7) that affected Live Messenger and the system theme, ZDNet’s Mary Jo Foley says that this new pack could be a way for Microsoft to bundle together features that will be updated faster than the Windows 10 OS itself.

The current list of programs in the Feature Experience Pack is fairly small and includes updated versions of the Snipping tool, text input panel, and shell-suggestion UI. With this modular approach, Microsoft would now be able to bypass Windows Update and release newer versions of these components, and those added later, through the Microsoft Store.

The effort also appears to be in-line with the company’s revised Windows 10X plans, allowing it to test shell components by bundling them together in future Insider builds and optimizing the OS’ UI/UX for upcoming devices.

Apart from the Windows Feature Experience Pack and several other changes in version 2004, the update also packs in its usual share of bugs as well. According to Windows Latest, the May 2020 update has caused issues with Microsoft’s Optimize Drives tool.

Although the utility defrags or trims storage media as it should, the program is unable to report the correct status for when the disks were last optimized. While it’s not a problem for users running third-party programs for maintaining drives, it’s potentially concerning for those solely relying on Microsoft’s tool.

The company was made aware of this problem in a previous Insider build, and a fix was included in January’s Preview Build 19551. The issue, however, seemingly slipped through the public build and is now expected to be patched in a future cumulative update.

Android 11 has a cool notification feature the iPhone should totally steal

Google quietly released the first Android 11 beta to the public this week, and you can test it out if you own a compatible device.

The list is very short, as it includes the Pixel 4 series and older models and the OnePlus 8 devices. OnePlus moved quite fast on this one, and other smartphone makers have confirmed they’ll support Google’s Android 11 public beta, including Oppo and Xiaomi.

Android 11 will focus on “people, controls, and privacy,” but not all of the new features will be immediately apparent to the user. In many ways, Google is refining the Android experience with each release, which is exactly what Apple is doing with iOS. Truth be told, these are already old operating systems that offer distinctive features and share plenty of similarities. New, iconic features are increasingly few and far between.

Like other Android releases, Android 11 does borrow some inspiration from the iPhone when it comes to a few features. But it also has a very interesting notification innovation that Apple should copy.

After many years, neither Google nor Apple has figured out how to perfect notifications. Google may be finally onto something here, as Android 11 notifications received a major makeover. All the notifications are automatically distributed and grouped into three separate categories: Conversations, Alerting notifications, and Silent notifications. In truth, only the former really matters, and I’d love to see something like this on the iPhone.

Android 11 will automatically add all the notifications that come from text messages to the Conversations menu, and that’s the first category you’ll see when you check your notifications.

When Steve Jobs unveiled the first iPhone, he said that Apple was introducing “three revolutionary products,” “a widescreen iPod with touch controls,” “a revolutionary mobile phone,” and “a breakthrough Internet communications device.” That was the iPhone in 2007. Many things have changed in the 13 years since.

The point I’m trying to make is that texting is such a crucial element of the current mobile experience that instant messaging notifications are usually the most important ones. What Google did with Android 11 is to group them all together, right on the top of all the other notifications. That way, you’ll never miss any important texts no matter what chat app they come from.

Android 11 animation shows the new Conversation notifications category sitting at the top of the screen. Image source: GoogleGoogle has gone even further than that, allowing you to prioritize conversations inside the Conversations notifications tab seen above. That way, messages from the people who matter most to you will always appear at the top of the list once you mark them as priorities. And some of those notifications will even override do not disturb mode. Moreover, you can change settings on the fly for these chat notifications inside the Conversations shade.

I’m not saying that Apple would have to replicate the Android 11 feature altogether. But grouping instant messaging notifications under a single tab that gets top placement in the notification screen is definitely something to consider.

Some developers already thought about such a feature and created an app that allows you to prioritize notifications on iPhone and iPad. But you’d have to jailbreak your iOS device in order to run Priority.

  • « Previous Page
  • 1
  • 2
  • 3
  • 4
  • 5
  • …
  • 25
  • Next Page »

Copyright © 2025 · Executive Pro Theme on Genesis Framework · WordPress · Log in